Principles of Geometric Transformations and Vectors
Transformations & Vectors: The Ultimate Glow-Up Guide ✨
Introduction
1. Introduction
Hey! Ever used a Snapchat filter that spins your face around, or moved your character across the screen in a game? Congrats, you're already a pro at transformations! This chapter is all about the math behind those moves. It might seem a bit tricky, but trust me, once you get the hang of it, it's like learning the ultimate cheat code for graphs. Let's level up! 🚀
2. Introduction to Translations
First up, translations. This is basically just sliding a shape around without rotating or resizing it. Think of it like swiping through TikToks – the video moves up, but it doesn't change size or turn upside down. We use something called a column vector to give the instructions for the slide. A column vector looks like this: . The top number, , tells you how far to move right (positive) or left (negative). The bottom number, , tells you how far to move up (positive) or down (negative). Easy, right? 'X to the left, Y to the fly!'
Worked example
Worked Example: Applying a Translation Vector
Worked Example: Performing a Translation
Triangle T has vertices at A(1, 2), B(4, 2), and C(1, 5). Translate Triangle T by the vector . Label the new triangle T'.
- 1The vector means we need to move each point 2 units to the right (because 2 is positive) and 3 units down (because -3 is negative). We'll apply this to each vertex one by one.
- 2Apply the translation to point A(1, 2):
- 3Apply the translation to point B(4, 2):
- 4Apply the translation to point C(1, 5):
- 5Now, plot the new points A', B', and C' on the grid and connect them to form the translated triangle T'. You'll see the whole triangle has just slid across the grid![IMAGE_PLACEHOLDER_1: A coordinate grid showing Triangle T with vertices A(1,2), B(4,2), C(1,5) and the translated Triangle T' with vertices A'(3,-1), B'(6,-1), C'(3,2). Arrows are drawn from A to A', B to B', and C to C' to show the movement.]
Answer
[IMAGE_PLACEHOLDER_1: A coordinate grid showing Triangle T with vertices A(1,2), B(4,2), C(1,5) and the translated Triangle T' with vertices A'(3,-1), B'(6,-1), C'(3,2). Arrows are drawn from A to A', B to B', and C to C' to show the movement.]
3. Introduction to Rotations about the Origin
Rotation is just turning a shape around a fixed point, called the centre of rotation. It's like spinning a fidget spinner – the centre stays put while the arms spin around it. To describe a rotation, you need three things:
1. The angle of rotation (e.g., , ).
2. The direction (clockwise or anticlockwise).
3. The centre of rotation.
Let's start with the easiest centre: the origin, point .
1. The angle of rotation (e.g., , ).
2. The direction (clockwise or anticlockwise).
3. The centre of rotation.
Let's start with the easiest centre: the origin, point .
Worked example
Worked Example: Rotating a Point about the Origin
Worked Example: Rotation of a point about the origin
Rotate the point P(4, 1) by anticlockwise about the origin .
- 1The best way to handle rotations is with tracing paper! Place the tracing paper over the grid, trace the axes, and mark the point P and the centre of rotation (the origin).[IMAGE_PLACEHOLDER_2: A coordinate grid with point P(4,1) and the origin (0,0) marked. A semi-transparent layer representing tracing paper is shown over it.]
- 2Keep your pencil tip firmly on the origin to act as a pivot. Now, turn the tracing paper anticlockwise (that's one quarter turn to the left).
- 3See where the mark for point P has landed on the grid underneath. It should be on a new coordinate. Read the new coordinate from the grid.
Answer
4. Rotation about a Point Other Than the Origin
Okay, things are getting real. What if the centre of rotation isn't the nice, comfy origin? What if it's some random point like ? Don't panic! The method is exactly the same. Your tracing paper is your best friend here. The only thing that changes is where you stick your pencil. Instead of pinning it at , you pin it at the new centre of rotation.
Worked example
Worked Example: Rotation about a Non-Origin Centre
Worked Example: Rotation about a point not at the origin
Triangle K has vertices at A(3, 4), B(5, 4), and C(5, 6). Rotate Triangle K about the centre .
- 1Get your tracing paper. Trace the triangle's vertices (A, B, C) and, most importantly, the centre of rotation C(3, 2).[IMAGE_PLACEHOLDER_3: A grid showing Triangle K and the centre of rotation (3,2).]
- 2Place your pencil on the centre of rotation . This is your anchor point. Now, turn the tracing paper . For , the direction (clockwise or anticlockwise) doesn't matter – you end up in the same spot!
- 3Look through the tracing paper to see where the new vertices A', B', and C' are.
A was 2 units up from the centre, so A' will be 2 units down: A'(3, 0).
B was 2 right and 2 up, so B' will be 2 left and 2 down: B'(1, 0).
C was 2 right and 4 up, so C' will be 2 left and 4 down: C'(1, -2).
Answer
5. Describing a Rotational Transformation
In an exam, they might give you the 'before' and 'after' shapes and ask you to describe the transformation. If you think it's a rotation, you need to state the three magic ingredients to get full marks. It's like ordering a specific coffee – you can't just say 'coffee', you have to say 'iced oat milk latte'. For rotations, you must state:
1. Transformation: 'Rotation'
2. Angle and Direction: e.g., ' clockwise'
3. Centre of Rotation: e.g., 'about the point '
Finding the centre can be tricky. A good trick is to connect a point on the original shape to its corresponding point on the image (e.g., A to A'). Do this for another pair of points (B to B'). The centre of rotation is where the perpendicular bisectors of these lines meet. Or, you can use your tracing paper and guess-and-check!
1. Transformation: 'Rotation'
2. Angle and Direction: e.g., ' clockwise'
3. Centre of Rotation: e.g., 'about the point '
Finding the centre can be tricky. A good trick is to connect a point on the original shape to its corresponding point on the image (e.g., A to A'). Do this for another pair of points (B to B'). The centre of rotation is where the perpendicular bisectors of these lines meet. Or, you can use your tracing paper and guess-and-check!
Worked example
Worked Example: Describing a Given Rotation
Worked Example: Describing a Rotation
Shape A has been mapped onto Shape B. Describe fully the single transformation that maps A onto B.
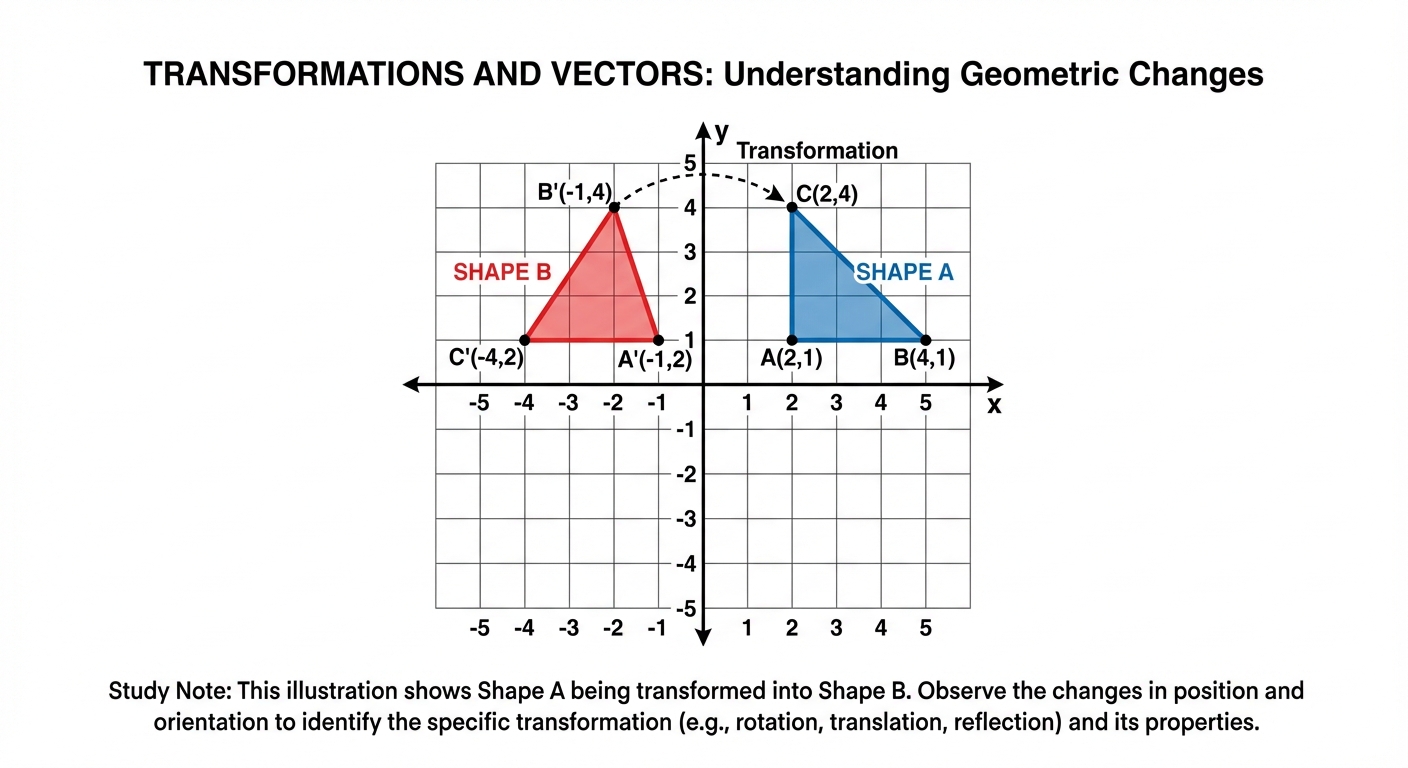
- 1First, identify the transformation. Shape B is the same size as A but has been turned. This is a rotation. So, the first part of our answer is 'Rotation'.Transformation: Rotation
- 2Next, find the angle and direction. Use tracing paper. Trace Shape A, then try rotating it around a likely centre point until it fits over Shape B. It looks like a quarter turn to the left, which is anticlockwise.Angle & Direction: 90° anticlockwise
- 3Finally, find the centre. Let's test a point. Pick a vertex on A, say (2,1), and its new position on B, (-1,2). Let's try rotating about the origin (0,0). A 90° anticlockwise turn of (2,1) gives (-1,2). It works! Let's check another point, (4,1), which becomes (-1,4). Perfect. The centre is the origin.
- 4Put it all together for the final answer.A rotation of 90° anticlockwise about the centre (0,0).
Answer
A rotation of 90° anticlockwise about the centre (0,0).
6. Understanding Enlargement and Scale Factors
Enlargement doesn't always mean getting bigger! If the scale factor is a fraction between 0 and 1 (like or ), the shape actually gets smaller. Think of it like using the 'pinch to zoom out' feature on your phone. To do this, you need a centre of enlargement and a scale factor. The key is to measure the distance from the centre to each vertex of your shape, and then multiply that distance by the scale factor to find the new vertex.
Worked example
Worked Example: Enlargement with a Fractional Scale Factor
Worked Example: Enlargement with a fractional scale factor
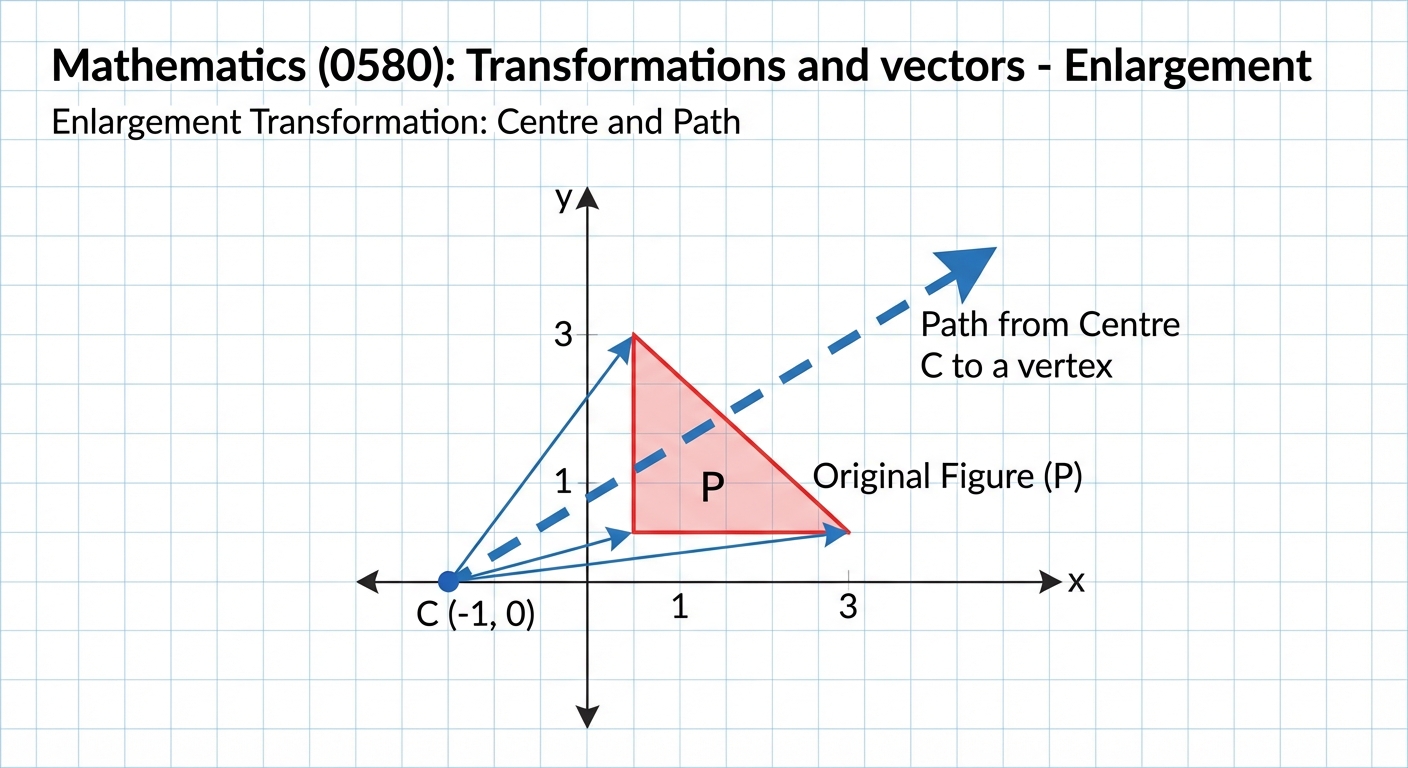
Enlarge triangle P with vertices (1, 2), (5, 2), (1, 4) by a scale factor of from the centre of enlargement C(-1, 0).
- 1This is easiest to think about using vectors or 'journeys'. First, find the journey from the centre C to the first vertex (1, 2). To get from -1 to 1 on the x-axis is 2 steps right. To get from 0 to 2 on the y-axis is 2 steps up. The vector is .[IMAGE_PLACEHOLDER_5: A grid showing triangle P and the Centre of Enlargement C(-1,0). An arrow shows the path from C to the vertex (1,2).]
- 2Now, multiply this journey vector by the scale factor, .
- 3This new vector is the journey from the centre C to the new vertex. Starting from C(-1, 0), move 1 right and 1 up. The new vertex is at .
- 4Repeat for the other vertices. Journey from C(-1, 0) to (5, 2) is . Multiply by to get . New point is . Journey from C(-1, 0) to (1, 4) is . Multiply by to get . New point is .
Answer
7. Reflection in Horizontal and Vertical Lines
Alright, let's talk about reflections. No, not your selfie game, but it's actually a super similar idea! In math, a reflection is like flipping a shape over a specific line, which we call the mirror line or line of reflection. Think of it like a perfectly flat mirror. Every single point on the original shape (we call this the object) gets copied to the other side of the mirror line to create the new shape (the image).
The golden rule is this: every point on the image is the exact same distance from the mirror line as its original point, but on the opposite side. The line connecting an original point to its new, reflected point will always hit the mirror line at a perfect 90-degree angle. For IGCSE Core, the good news is we only deal with simple mirror lines: either perfectly horizontal (like the horizon) or perfectly vertical (like a skyscraper).
A horizontal line is always written as , where 'c' is the number it crosses on the y-axis. For example, the x-axis itself is the line . A vertical line is always , where 'c' is where it crosses the x-axis. The y-axis is the line .
To perform a reflection, you just take it one corner (or vertex) at a time. Count the squares from a vertex to the mirror line. Then, count the same number of squares on the other side and plot your new point. Do this for all the vertices, connect the dots with a ruler, and you're done!
The golden rule is this: every point on the image is the exact same distance from the mirror line as its original point, but on the opposite side. The line connecting an original point to its new, reflected point will always hit the mirror line at a perfect 90-degree angle. For IGCSE Core, the good news is we only deal with simple mirror lines: either perfectly horizontal (like the horizon) or perfectly vertical (like a skyscraper).
A horizontal line is always written as , where 'c' is the number it crosses on the y-axis. For example, the x-axis itself is the line . A vertical line is always , where 'c' is where it crosses the x-axis. The y-axis is the line .
To perform a reflection, you just take it one corner (or vertex) at a time. Count the squares from a vertex to the mirror line. Then, count the same number of squares on the other side and plot your new point. Do this for all the vertices, connect the dots with a ruler, and you're done!
If you're asked to find the mirror line, just find the halfway point between the object and the image. It'll be a straight line smack in the middle. It's basically a copy-paste, but flipped. You got this!
Worked example
Worked Example: Reflection in a Vertical Line
Let's Flip This Triangle 📐
Triangle T has vertices at points A(2, 4), B(5, 4), and C(2, 1). Reflect Triangle T in the mirror line to create Triangle T'. State the coordinates of the vertices of T'.
- 1First up, let's identify and draw our mirror line. The problem gives us the line . This is a vertical line that passes through the number 1 on the x-axis. Drawing this line on your grid first is a pro gamer move – it helps you see exactly what you're reflecting over.Mirror Line: (A vertical line)
- 2Now, let's reflect each vertex one by one. We'll start with point A(2, 4). How many squares is it from the mirror line at ? It's 1 square to the right. So, its reflection, A', must be 1 square to the left of the line. The y-coordinate doesn't change when reflecting in a vertical line.
- 3Next, let's do point B(5, 4). How far is it from the line ? We count from 5 to 1, which is 4 squares to the right. So, B' must be 4 squares to the left of the line. We start at and move 4 units left, which gets us to . The y-coordinate stays the same.
- 4Last vertex! Point C is at (2, 1). Just like point A, it's 1 square to the right of the mirror line . Therefore, its image, C', will be 1 square to the left of the line. Again, the y-coordinate stays put.
- 5Finally, connect your new points A', B', and C' with a ruler to draw the reflected triangle, T'. And don't forget to list the new coordinates as the question asks! Job done. [IMAGE_PLACEHOLDER_2: A final grid showing the original Triangle T, the vertical mirror line at x=1, and the new reflected Triangle T' with its vertices A', B', and C' labelled.]The coordinates of Triangle T' are A'(0, 4), B'(-3, 4), and C'(0, 1).
Answer
The coordinates of Triangle T' are A'(0, 4), B'(-3, 4), and C'(0, 1).
Worked example
Worked Example: Reflection in the Line
Triangle has vertices , , . Reflect in the line . State the coordinates of the image . 🪞
- 1Quick rule for reflection in the line : swap the and coordinates of every point. Each becomes .
- 2Apply to each vertex.
- 3Sanity check by plotting (or just visualising): the image triangle should be a 'mirror' of the original across the diagonal line . ✅
Answer
Worked example
Worked Example: Describing a Transformation from Coordinates
Triangle has vertices . Triangle has vertices . Describe the single transformation that maps onto . 🎯
- 1Compare matching vertices in the same order. From to , every -coordinate goes up by , every -coordinate goes down by . Same shift for every point = translation.
- 2Translation described by a column vector .
- 3Write the full description in the language examiners want — name the transformation and give all the details (for translation, just the vector).
Answer
8. Column Vectors and Magnitude
Okay, so you already met column vectors when you learned translations. A vector is just a quantity with a size and a direction, and we write it as a column vector like . The top number is how far across (right is positive, left is negative) and the bottom number is how far up or down. Same energy as a translation instruction, but now the vector itself is the main character.
The magnitude of a vector is just its length, and finding it is basically Pythagoras in disguise. If your vector is , draw a right-angled triangle with across and up, and the vector is the hypotenuse. So the magnitude is . The and get squared, so a negative sign disappears, which means direction doesn't change the length. A vector and its reverse are the same length. 📏
The magnitude of a vector is just its length, and finding it is basically Pythagoras in disguise. If your vector is , draw a right-angled triangle with across and up, and the vector is the hypotenuse. So the magnitude is . The and get squared, so a negative sign disappears, which means direction doesn't change the length. A vector and its reverse are the same length. 📏
Worked example
Worked Example: Finding the Magnitude of a Vector
Pythagoras Strikes Again 📐
Find the magnitude of the vector .
- 1Write down the magnitude formula. The magnitude is the square root of the sum of the squares of the two components.
- 2Substitute and and square each one.
- 3Add inside the square root, then take the root. Because is a perfect square you get a whole number.
Answer
9. Adding and Subtracting Vectors
Adding vectors is honestly the easiest thing in this whole topic: you just add the top numbers together and the bottom numbers together, separately. So . Think of it like doing one slide and then another slide straight after; the single vector that gets you from start to finish is called the resultant.
Subtracting works the exact same way, just take the bottoms from the bottoms and the tops from the tops: . Watch your signs when the numbers are negative, that is where most marks get dropped. Keep the top row lined up with the top row and you're golden. 🎯
Subtracting works the exact same way, just take the bottoms from the bottoms and the tops from the tops: . Watch your signs when the numbers are negative, that is where most marks get dropped. Keep the top row lined up with the top row and you're golden. 🎯
Worked example
Worked Example: Finding a Resultant Vector
Two Slides, One Answer 🛝
Given and , find the resultant .
- 1Line up the two column vectors and add the top components together.
- 2Now add the bottom components. Be careful, one of them is negative.
- 3Stack the two results back into a single column vector. That is your resultant.
Answer
10. Parallel Vectors and Scalar Multiples
When you multiply a vector by a plain number (a scalar), you just multiply both components by it: . Doubling a vector makes it twice as long but pointing the exact same way. Multiplying by a negative flips it to point the opposite way.
Here's the key idea for the exam: two vectors are parallel if one is a scalar multiple of the other. So and are parallel because the second is exactly times the first. To test if two vectors are parallel, check whether the top numbers and the bottom numbers scale by the same factor. If they do, they're parallel; if they don't, they're not. 🧠
Here's the key idea for the exam: two vectors are parallel if one is a scalar multiple of the other. So and are parallel because the second is exactly times the first. To test if two vectors are parallel, check whether the top numbers and the bottom numbers scale by the same factor. If they do, they're parallel; if they don't, they're not. 🧠
Worked example
Worked Example: Spotting Parallel Vectors
Find the Twin Direction 👯
The vector . Which of these is parallel to : , or ?
- 1Remember the rule: a vector is parallel to only if it is a single scalar multiple of , meaning both components multiply by the same number.
- 2Test . Top: . Bottom: . Same factor of on both, so this one is parallel.
- 3Quick sanity check on : the top scales by but the bottom scales by , different factors, so not parallel. So the parallel vector is .
Answer
Practice this in the app
Unlock the full chapter: practice questions, flashcards, mock papers and notes, free.
Continue revising